...
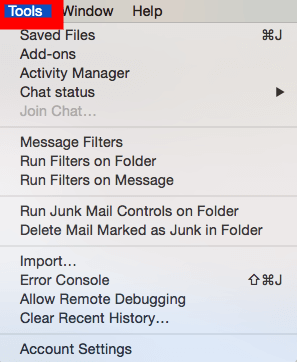
Step 1: Choose "Tools" and then "Account Settings";
Step 2 : Next choose "Add Mail Account" and then "Ok".
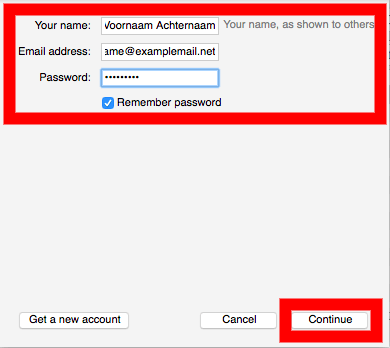
Step 3 : You will end up in the screen below. Where you can specify the following settings;
1. Your Name : Enter the name for your new email account here;
2. Email address : Enter the correct e-mail address here;
3. Password : Enter the corresponding password here.
If you have filled in the above you can choose " Continue ".
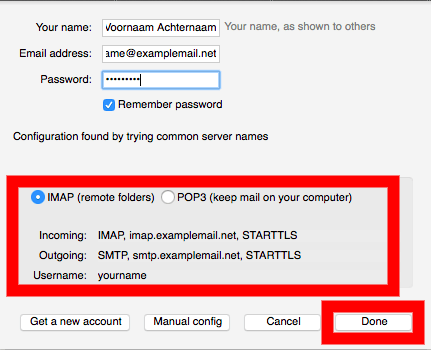
Step 4 : In the screen below extra possibilities are available for Imap and Pop .
...
IMAP: The e-mail remains on the server so you can access it from multiple devices. Pop: The e-mail is forwarded to your device. Does not remain on the server. |
The example below is based on " imap " (recommended).
Step 5 : At the last step you can enter additional settings;
...
When outgoing, enter " yourname.examplemail.net " ( note the point instead of the @ )
Then choose " Done ".
Your new email account has now been successfully created. You can now send and receive mail.
...
ขั้นตอนที่ 1 : เลือกที่ "Tools" และให้ทำการเลือกที่ "Account Settings"
ขั้นตอนที่ 2 : เลือกที่ "Add mail Account" และให้ทำการเลือกที่ "Ok"
ขั้นตอนที่ 3 : ท่านจะเห็นหน้าจอตามรูปภาพดังกล่าว ซึ่งท่านสามารถเติมข้อมูลลงในช่องดังนี้
1. Your Name : กรอกชื่อของท่านสำหรับการสร้างบัญชีอีเมล
2. Email address : กรอกที่อยู่อีเมลของท่าน
3. Password : กรอกรหัสผ่านอีเมลของท่าน
หลังจากที่ท่านกรอกข้อมูลเรียบร้อยแล้ว ท่านสามารถเลือกที่ "Continue" เพื่อดำเนินการขั้นต่อไป
ขั้นตอนที่ 4 : ตามรูปทางด้านล่างสำหรับท่านที่ต้องการใช้ IMAP และ POP
...
IMAP : อีเมลอยู่ในเซิร์ฟเวอร์ทำให้สามารถเข้าใช้งานได้จากหลายอุปกรณ์ |
ตัวอย่างทางด้านล่างของการตั้งค่าด้วย "IMAP" (ค่าที่แนะนำ)
ขั้นตอนที่ 5 : ขั้นตอนสุดท้ายท่านสามารถตั้งค่าเพิ่มเติมได้ดังนี้
...
หลังจากนั้นเลือกที่ " Done "
เมื่อท่านตั้งค่าบัญชีอีเมลเรียบร้อยแล้ว ท่านสามารถใช้งานอีเมลได้ตามปกติ
...


