Required data
After you have created an e-mail address in the CodeOrange Control Panel , you can then use this information to set up your Windows Live Mail to receive e-mail.
Note: If you set up our SMTP server, but do not set a user name and password for outgoing e-mail, you will receive an error when sending: Relay access denied. |
| The server name for your domain can be found by re-storing the data of an e-mailbox in the Control Panel (without changes). Then you will see all the data including the server name. |
- E-mail address;
- E-mail user name;
- E-mail password;
- Incoming mail server;
- Imap or Pop3;
- Server for outgoing e-mail
- Gate
Set up e-mail account step by step
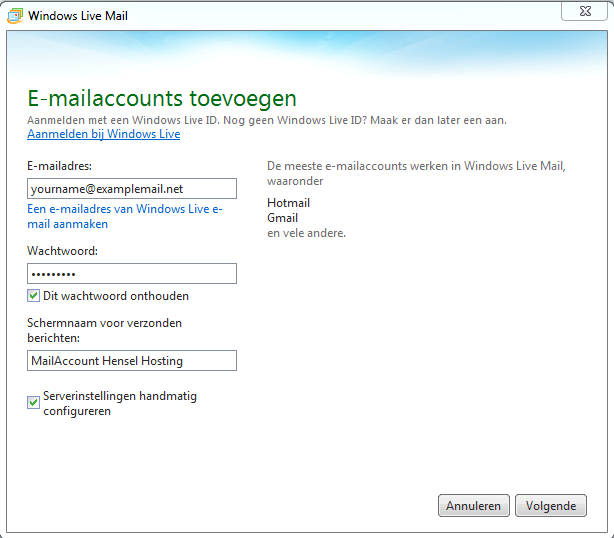
Step 1: Open Windows Live Mail and choose " Accounts " and then go to " E-mail ", the pop-up below will be opened;
Step 2: After you have entered these settings, place a check mark next to "configure server settings manually". Select "Next" and you will arrive in the screen below;
- Do you want to use Imap? Then choose " Imap " (Recommended)
- Do you want to use Pop? Then choose " Pop ";
IMAP: The e-mail remains on the server so you can access it from multiple devices. |
The following example is based on IMAP, if you want to use POP click on server type for " POP "
Incoming email (pop3 / imap)
- Server address: orange.orangedemo7423.com
- Port (SSL): 995
- Username: yourname@examplemail.net
Outgoing email (smtp)
- Server address: orange.orangedemo7423.com
- Port (SSL): 465
- Username: yourname.examplemail.net
Note, on the left:
Incoming username is the entire e-mail address, with a @
On the right:
Required verification must be checked. Port is 465
Outgoing user name is your e-mail address with a dot instead of a @, so firstname.lastname@domain.com
Step 3: After you have chosen "next" the account is successfully configured. You can now send and receive email.
Windows and Live mail are in no way connected to CodeOrange, therefore CodeOrange does not provide support for the use of Windows or Live Mail outside this manual.
สำหรับคู่มือภาษาไทยมีดังนี้
ข้อมูลที่ต้องการ
หลังจากที่ท่านได้ทำการสร้างอีเมลใน CodeOrange Control Panel แล้วท่านสามารถใช้ข้อมูลดังนี้เพื่อทำการตั้งค่าของฮันเดอร์เบิร์ดของท่านเพื่อรับอีเมล
หากท่านตั้งค่าบน SMTP server ของเราแต่ไม่ได้ตั้งค่ายูเซอเนมและพาสเวิร์ดสำหรับเมล outgoing ท่านจะได้รับข้อความ error ตอบกลับเมื่อทำการส่งว่า Relay access denied. |
| ชื่อเซิฟเวอร์โดเมนของท่านสามารถหาได้จากการ re-storing ข้อมูลของกล่องอีเมลใน Control Panel ในนั้นท่านสามารถดูข้อมูลต่างๆได้รวมทั้งชื่อเซิฟเวอร์ |
ข้อมูลที่ต้องการ :
ท่านควรเตรียมข้อมูลสำคัญให้พร้อมก่อนที่จะดำเนินตามขั้นตอนดังต่อไปนี้ (ซึ่งข้อมูลดังกล่าวจะถูกแสดงหลังจากที่ท่านได้ทำการสร้างอีเมล)
1. Address อีเมล
2. ยูเซอร์เนม อีเมล
3. พาสเวิร์ด อีเมล
4. Incoming เมล server
5. Server สำหรับอีเมล outgoing
7. Gate
ขั้นตอนการตั้งค่าบัญชีอีเมล
ขั้นตอนที่ 1 : เปิด Windows Live Mail และเลือกที่ "Accounts" และเลือกที่ "E-mail" หน้าต่างจะถูกเปิดขึ้นมา
ขั้นตอนที่ 2 : หลังจากทำการเข้าสู่การตั้งค่า ให้ติ๊กถูกหน้า "configure server setting manually". เลือก "Next" หลังจากนั้นท่านจะถูกลิ้งไปยังหน้าดังนี้
หากท่านต้องการใช้ POP ให้ทำการเลือกที่ "POP
หากท่านต้องการใช้ IMAP ให้ทำการเลือกที่ "IMAP" (ค่าพื้นฐานที่เราแนะนำ)
IMAP : อีเมลอยู่ในเซิฟเวอร์ทำให้สามารถเข้าใช้งานได้จากอุปกรณ์ชนิดอื่นๆ |
ตัวอย่างทางด้านล่างของการตั้งค่าด้วย "IMAP" (ค่าที่แนะนำ)
Incoming email (pop3 / imap)
- Server address: orange.orangedemo7423.com
- Port (SSL): 995
- Username: yourname@examplemail.net
Outgoing email (smtp)
- Server address: orange.orangedemo7423.com
- Port (SSL): 465
- Username: yourname.examplemail.net
ทางด้านซ้าย
Incoming ยูเซอเนมคืออีเมลทั้งอีเมลรวมถึง @
ทางด้านขวา
ต้องการการยืนยันข้อมูลด้วยว่า Port คือ 465
Outgoing ยูเซอเนมให้ใช้จุดแทน @ยกตัวอย่างเช่น firstname.lastname@domain.com (ชื่อตามด้วยจุดแล้วตามด้วยนามสกุล
Outgoing user name is your e-mail address with a dot instead of a @, so firstname.lastname@domain.com
ขั้นตอนที่ 3 : หลังจากเลือกที่ "Next" บัญชีอีเมลของท่านเป็นอันเสร็จสิ้นการตั้งค่าและสามารถใช้งานรับส่งอีเมลได้


0 Comments