Set up CDN / การติดตั้ง CDN
- Chanakan Phankaew
- panupong (Unlicensed)
| Please request to our helpdesk if you need to use CDN |
|---|
When you receive email CDN ready to use, you can follows this:
- Login your WordPress
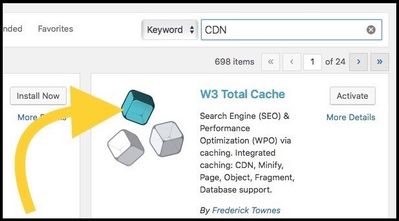
- Install and activate W3 Total Cache plugs-in
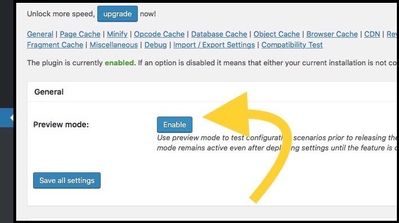
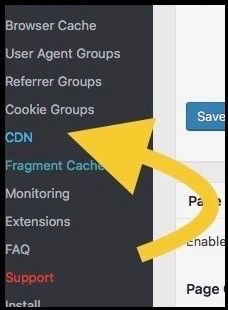
- In the menu performance, select General Settings and scroll down to CDN
- Check the box “Enable CDN”
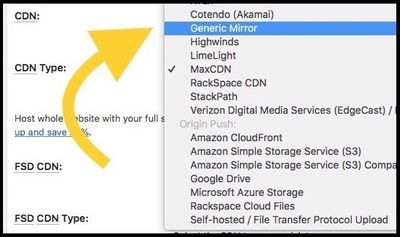
- Choose CDN Type: Generic Mirror
- Save All Settings
- Now you can enter your CDN name menu performance under CDN
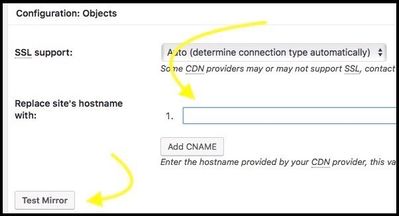
- Enter CDN name in textbox under Configuration Replace site’s hostname with: <CDN name>
- Click Test Mirror to check the CDN is functioning properly
- Save all setting
Or you can follow steps with screenshot below:
1. LogIn your WordPress
2. Go to Plugins and click Add New

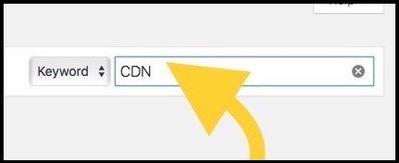
3. Insert keyword CDN in the box and Enter for CDN Plug-In
4. Install and Activate W3 Total Cache PlugIns
5. In the menu performance, select General settings and scroll down to CDN, check the box to Enable CDN
6. Choose CDN type: Generic Mirror and then save all setting
7. Now you can enter your CDN name menu performance under CDN
8. Enter CDN name in text box under configuration Replace site’s hostname with: <CDN name> Click Test Mirror to check the CDN is functioning properly
9. And then save all setting
Notes:
-The CDN can be accessed using HTTP or HTTPS. Make sure to use HTTPS (SSL), if your
website uses an HTTPS:// address. Otherwise you will likely end up with mixed-content warnings
in your browser (images being loaded from http links).
You will check CDN already by open image URL and URL shows <IDENTIFIER>.cloudfront.net instead of domain name
or check in your browser:
Firefox: Tools->Web developer>Web Console
Chrome: View->Developer>Developer Tools Tab: Console
Safari: Develop->Show Error Console
For example: http://www.example.com/aaa.jpg
If website have CDN, it get <IDENTIFIER>. http://cloudfront.net/aaa.jpg
สำหรับภาษาไทยดังนี้
| กรุณาติดต่อฝ่ายซัพพอร์ตหากท่านต้องการใช้งาน CDN |
|---|
เมื่อท่านได้รับอีเมลยืนยันความพร้อมใช้งานของ CDN แล้ว ท่านสามารถตั้งค่าการใช้งานได้ดังนี้:
เข้าสู่ระบบของ WordPress
ติดตั้ง และเปิดการใช้งานของปลั๊กอิน W3 Total Cache ที่เมนูปลั๊กอิน
ที่เมนู Performance เข้าไปที่ General Setting และเลื่อนลงมาตรงหัวข้อ CDN
คลิกเลือก enable CDN
เลือก CDN Type เป็น Generic Mirror
คลิก Save all settings
ที่เมนู Performance เข้าไปที่ CDN
ใส่ชื่อ CDN ที่ได้รับจากอีเมลลงในช่อง Replace site’s hostname with:
คลิก Test Mirror เพื่อตรวจสอบการทำงานของ CDN
คลิก Save all settings
หรือสามารถดูขั้นตอนวิธีการทำและรูปภาพทางด้านล่าง
1. เข้าสู่ระบบของ WordPressไปยังหัวข้อ Plugins และเลือกที่ตัวเลือก Add New
2. พิมพ์ CDN ลงในช่องคนหาเพื่อหาโปรแกรมเสริมเกี่ยวกับ CDN
3. ติดตั้ง และเปิดการใช้งานของปลั๊กอิน W3 Total Cache ที่เมนูปลั๊กอิน
4. ที่เมนู Performance เข้าไปที่ General Setting และเลื่อนลงมาตรงหัวข้อ CDN คลิกเลือก Enable
5. เลือก CDN Type เป็น Generic Mirrorและคลิกเลือกที่ Save all settings
6. ที่เมนู Performance เข้าไปที่ CDN
7. ใส่ชื่อ CDN ที่ได้รับจากอีเมลลงในช่อง Replace site’s hostname with: คลิก Test Mirror เพื่อตรวจสอบการทำงานของ CDN และคลิก Save all settings
หมายเหตุ
CDN สามารถเข้าถึงได้ทั้ง http:// และ https:// หากท่านตั้งค่าเว็บไซต์เป็น https:// กรุณาตรวจสอบเว็บไซต์ของท่านว่าใช้ https (SSL) เรียบร้อยแล้ว
ไม่เช่นนั้นจะมีการแจ้งเตือนเว็บไซต์ว่าเป็น mixed-content เช่น รูปภาพที่โหลดจาก http
หลังจากท่านตั้งค่าการใช้งาน ท่านสามารถตรวจสอบการใช้งาน CDN ได้โดยการเปิด URL ของรูปนั้นจะแสดงเป็น <IDENTIFIER>.http://cloudfront.net/ แทน URL ของเว็บไซต์แบบปกติ
หรือสามารถตรวจสอบการใช้งานได้จากเบราว์เซอร์ดังนี้:
Firefox: Tools->Web developer>Web Console
Chrome: View->Developer>Developer Tools Tab: Console
Safari: Develop->Show Error Console
ตัวอย่างการแสดงผลเมื่อเปิดใช้งาน CDN
http://www.example.com/aaa.jpg
หากใช้งาน CDN จะมี URL คือ <IDENTIFIER>.http://cloudfront.net/aaa.jpg
การตั้งค่า CDN ที่เว็บไซต์ของท่านขึ้นอยู่กับ CMS และปลั๊กอินที่ท่านใช้ กรุณาดูเอกสารประกอบการใช้งานนั้นๆ สำหรับ generic CDN