Step-by-step guide
This article explains step by step how to configure an e-mail account in Windows Live Mail. The steps are explained by means of screenshots.
Required data
After you have created an e-mail address in the CodeOrange Control Panel , you can then use this information to set up your Windows Live Mail to receive e-mail.
Note: If you set up our SMTP server, but do not set a user name and password for outgoing e-mail, you will receive an error when sending: Relay access denied. |
| The server name for your domain can be found by re-storing the data of an e-mailbox in the Control Panel (without changes). Then you will see all the data including the server name. |
- E-mail address;
- E-mail user name;
- E-mail password;
- Incoming mail server;
- Imap or Pop3;
- Server for outgoing e-mail
- Gate
Set up e-mail account step by step
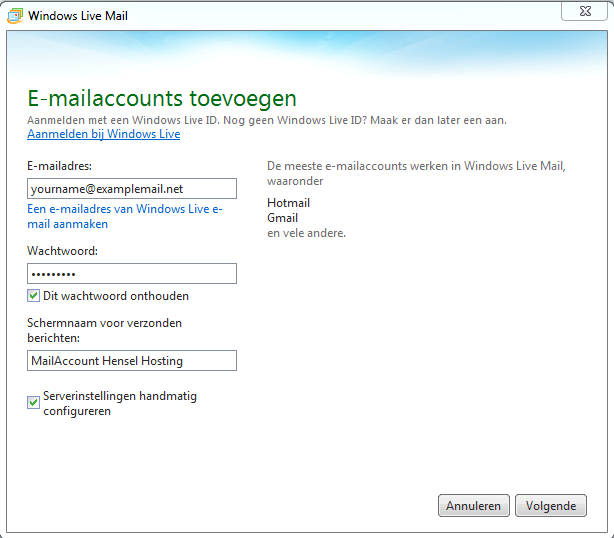
Step 1: Open Windows Live Mail and choose " Accounts " and then go to " E-mail ", the pop-up below will be opened;
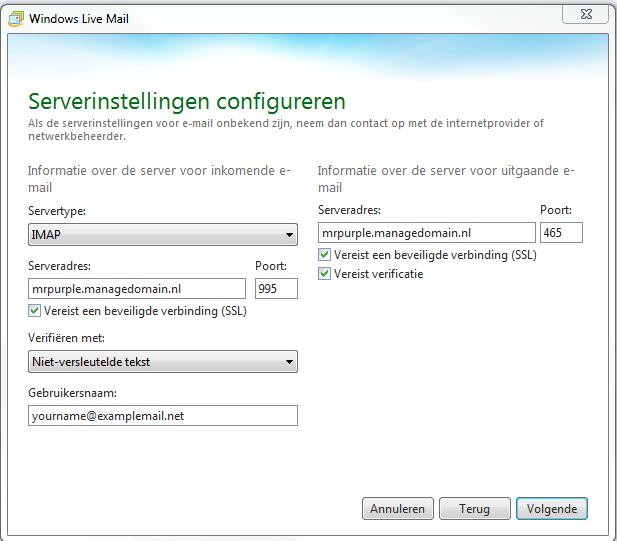
Step 2: After you have entered these settings, place a check mark next to "configure server settings manually". Select "Next" and you will arrive in the screen below;
- Do you want to use Imap? Then choose " Imap " (Recommended)
- Do you want to use Pop? Then choose " Pop ";
| IMAP: The e-mail remains on the server so you can access it from multiple devices. Pop: The e-mail is forwarded to your device. Does not remain on the server. |
The following example is based on IMAP, if you want to use POP click on server type for " POP "
Incoming email (pop3 / imap)
- Server address: orange.orangedemo7423.com
- Port (SSL): 995
- Username: yourname@examplemail.net
Outgoing email (smtp)
- Server address: orange.orangedemo7423.com
- Port (SSL): 465
- Username: yourname.examplemail.net
Note, on the left:
Incoming username is the entire e-mail address, with a @
On the right:
Required verification must be checked. Port is 465
Outgoing user name is your e-mail address with a dot instead of a @, so firstname.lastname@domain.com
Step 3: After you have chosen "next" the account is successfully configured. You can now send and receive email.
Windows and Live mail are in no way connected to CodeOrange, therefore CodeOrange does not provide support for the use of Windows or Live Mail outside this manual.
Related articles
Filter by label
There are no items with the selected labels at this time.


Add Comment